
 After all the intended body parts have been enlarged, it's a good idea to go back and check your enhancements. The best way to do this is to go to the Layers window and check each part individually (assuming they're all on separate layers).
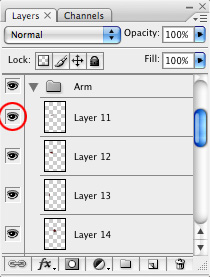
Start at the top layer and zoom in around the area in question. Click the Eye icon at the left of the layer. This will hide the layer and you should see the original body part. Click the same icon again to show it. Do this on/off a few times quickly and it will almost seem like an animation. More importantly, it will show you imperfections in the morphed area.
Many times you will notice a hard edge that you didn't see before. Use the Eraser tool with a soft airbrush setting to remove the edge. There may be random pixels showing up in places you didn't intend or other errors you didn't notice before. This gives you a better way to see them.
This takes some time depending on how many layers you have. In the end your morphs will look cleaner and more realistic.
See the Full Tutorial and Happy Morphing
No comments:
Post a Comment
Note: Only a member of this blog may post a comment.